

Got an old dresser that’s scratched, chipped, or just doesn’t fit your space anymore? Don’t toss it—fix it up. I’ve done this myself, and with the right ideas, it’s easier than you’d think.
In this blog, I’ll walk you through how to check if it’s solid wood or laminate, pick the right tools, and try simple dresser restoration ideas that actually work.
You’ll learn how to prep the surface, fix damage, and use finishes that make the piece feel new again. If you’re aiming for a clean, modern style or a more vintage look, there’s something here for you.
Let’s turn that forgotten piece into something useful and fresh. Something you’ll be glad you kept.
How to Begin a Dresser Restoration
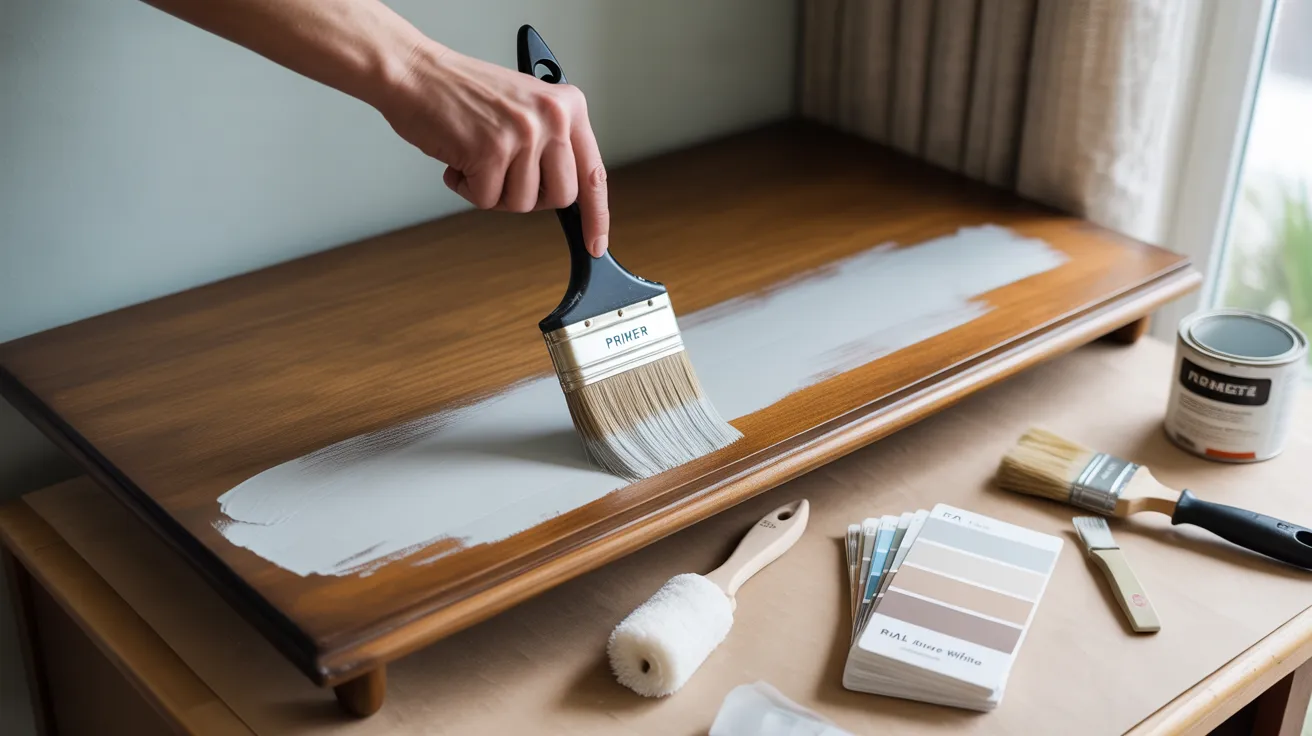
Restoring a dresser can be fun and budget-friendly. Before jumping in, it’s important to know what you’re working with and what you’ll need to get the job done right.
Before you start, check your dresser’s material: wood, laminate, or veneer.
Basic tools you’ll need:
- Screwdriver
- Sandpaper
- Paintbrush
- Drop cloth
- Paint
- Stain
- Primer
- Sealant
Always clean the dresser first. A little prep goes a long way in making your restoration smooth and successful.
Solid Wood vs. Laminate: Picking the Right Method
Solid wood dressers are heavier, show natural grain, and can be sanded without much trouble. Laminate dressers are lighter, have a slick or shiny surface, and need a special primer to help paint stick.
For laminate, paint-and-stick products work best. Always test a small, hidden area before starting. Knowing what you’re working with helps you choose the right tools and avoid mistakes during the makeover.
Easy DIY Makeovers for Beginners
Start simple with these fun and fast dresser ideas. You don’t need special tools or skills. These projects are perfect for first-timers and bring fresh style with very little effort.
1. Simple White Paint Makeover

Use plain white furniture paint to freshen up the whole dresser. Remove the hardware, clean the surface, and paint with a small roller.
This project is great for first-timers. It makes any old dresser look cleaner and brighter. Add new knobs to give it a new look with almost no effort.
2. Peel-and-Stick Wallpaper Fronts

Pick your favorite peel-and-stick wallpaper and cover the drawer fronts. Clean the surface before applying. Cut the wallpaper to size and smooth it out carefully.
This adds color or pattern without paint. You can also switch it out later if you want a change. Great for renters or quick weekend projects.
3. No-Sanding Paint Job
Use a bonding primer that sticks without sanding. Clean the surface, apply primer, then paint. This saves time and mess.
Choose soft colors for a calm look or something brighter for fun. It’s an easy way to update laminate or glossy surfaces without the hard work of sanding everything down.
4. Stencil Drawer Designs

Buy a simple stencil pattern online or make one yourself. Use it to paint fun shapes or words on each drawer. Pick two colors that go well together.
Tape the stencil in place and dab gently with a sponge. It’s a quick way to make the dresser feel more personal.
5. New Hardware Only
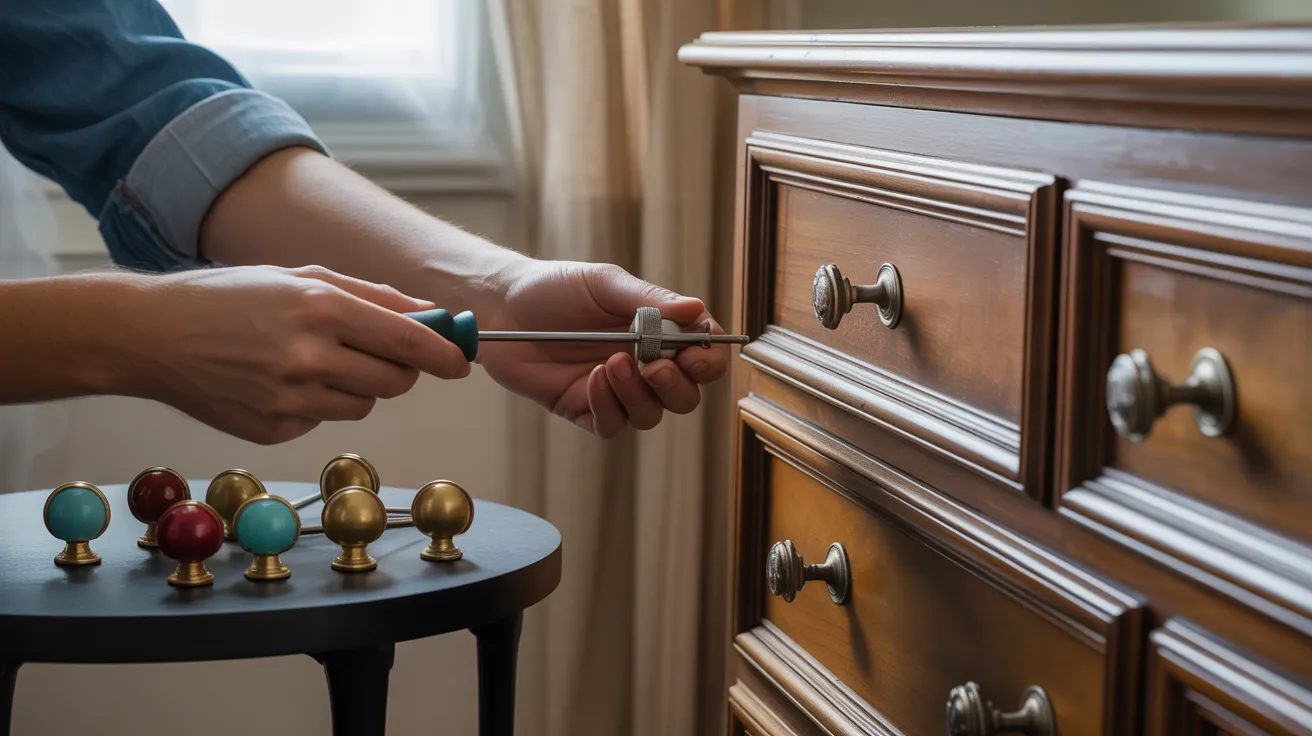
Sometimes all a dresser needs is new handles or knobs. Swap out old ones with brass, black, or even colorful plastic ones.
Make sure the size fits the holes you already have. This small update takes only minutes but changes the feel of the dresser right away.
6. Fabric-Covered Drawers

Use thin cotton fabric and glue to wrap drawer fronts. Choose patterns that match your room. Cut to fit, smooth out bubbles, and seal with clear glue.
This makes your dresser look softer and different. It’s also fun to mix and match different prints for a playful feel.
7. Colored Drawer Edges
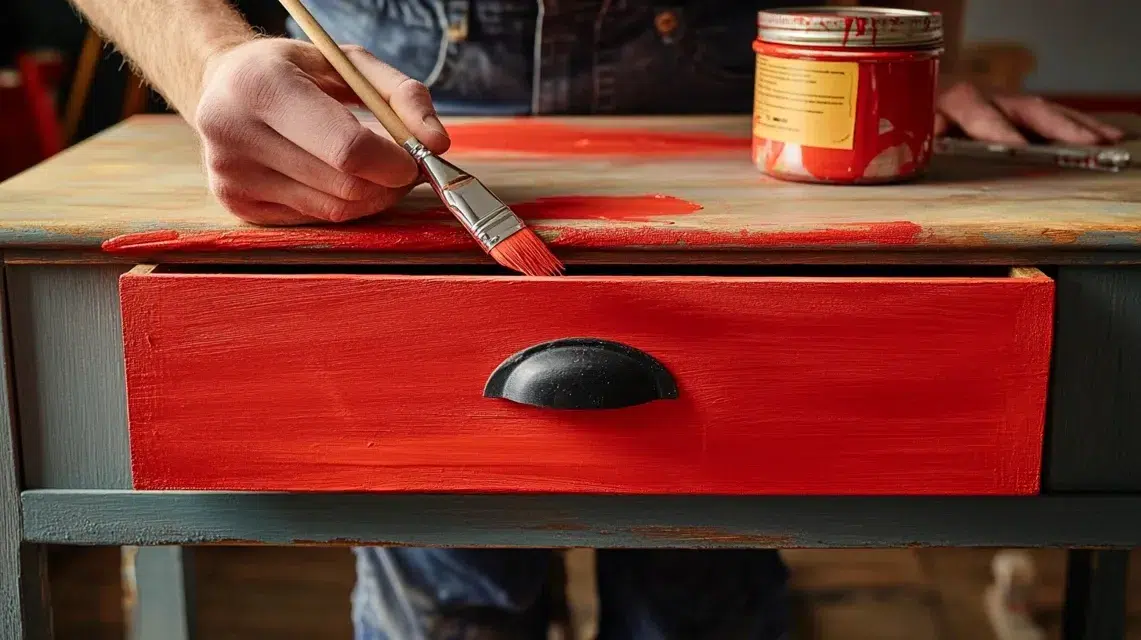
Instead of painting the full drawer, just paint the sides that show when you pull it out. Pick a color that pops, like bright yellow or red.
It’s a fun surprise and very easy to do. Use painter’s tape for clean lines. Let each coat dry before sliding the drawers back in.
8. Contact Paper Top

Stick wood-patterned or marble-looking contact paper to the top of the dresser. This covers stains or damage and makes it look new.
Clean the surface, measure carefully, and press it on slowly to avoid air bubbles. It’s removable, so you can change styles later without messing up the dresser.
9. Spray Paint the Hardware

Take off the knobs or handles, clean them, and use spray paint to make them look new. Go for matte black, gold, or even a bright color.
Let them dry completely before putting them back. This small step adds a lot of style without spending much money.
10. Drawer Liner Pop
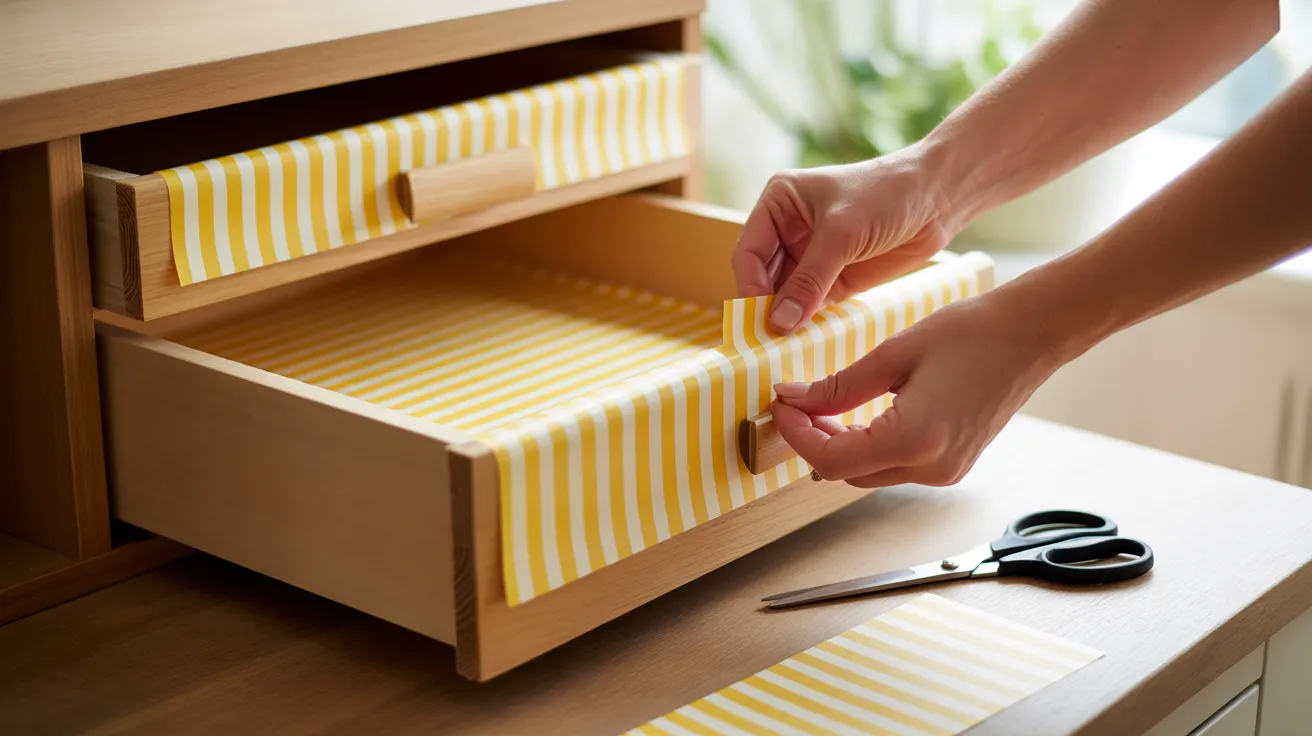
Line each drawer with colorful paper or sticky liner. Choose a bold print or a calm pastel. Cut it to size and press it in. This makes the inside of the dresser as fun as the outside. It’s a nice surprise every time you open a drawer, and it adds personality fast.
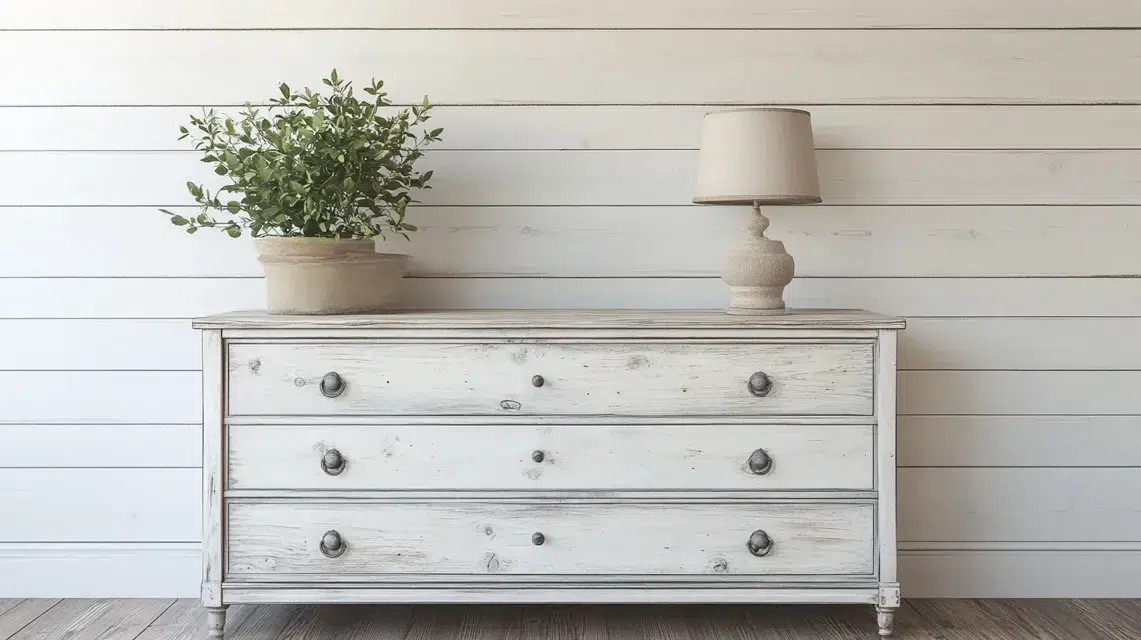
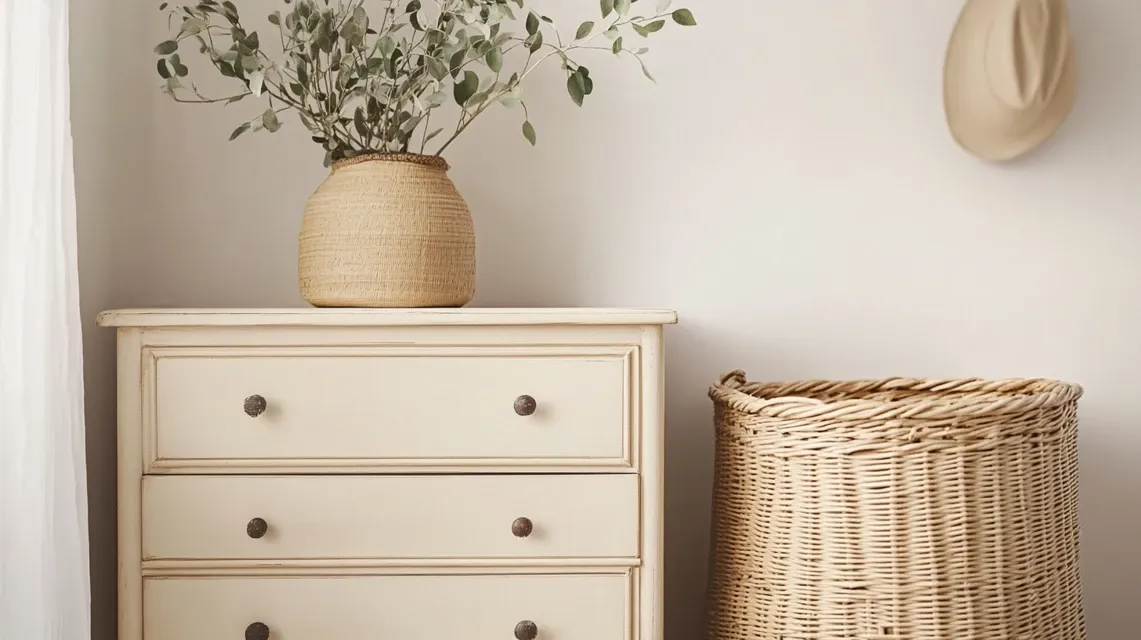
Finish and Style the Dresser: Once all your updates are done, paint dry, hardware in place, and liners smoothed out, step back and look at your dresser. Wipe away any dust or fingerprints.
Then style the top with a small lamp, framed photo, or plant. This last step pulls everything together and gives your newly updated dresser a fresh, finished look.
Colorful and Eye-Catching Paint Ideas
Add bright colors, bold designs, or soft fades to your dresser. These paint ideas are fun and help your furniture stand out. They work great in bedrooms, offices, or playrooms.
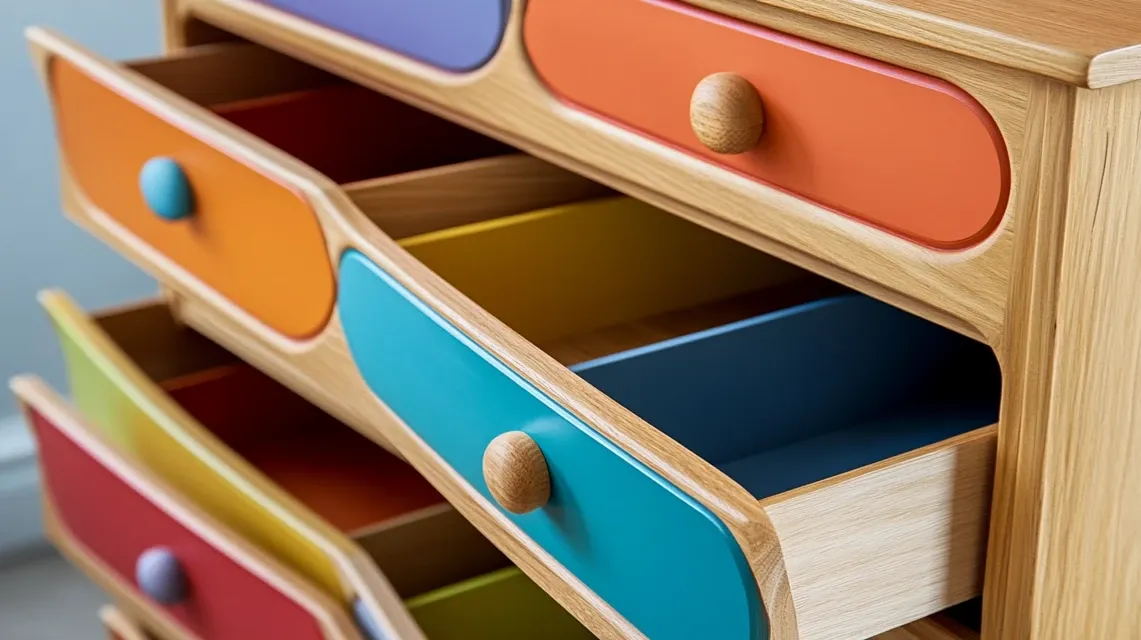
11. Bold Color Blocking
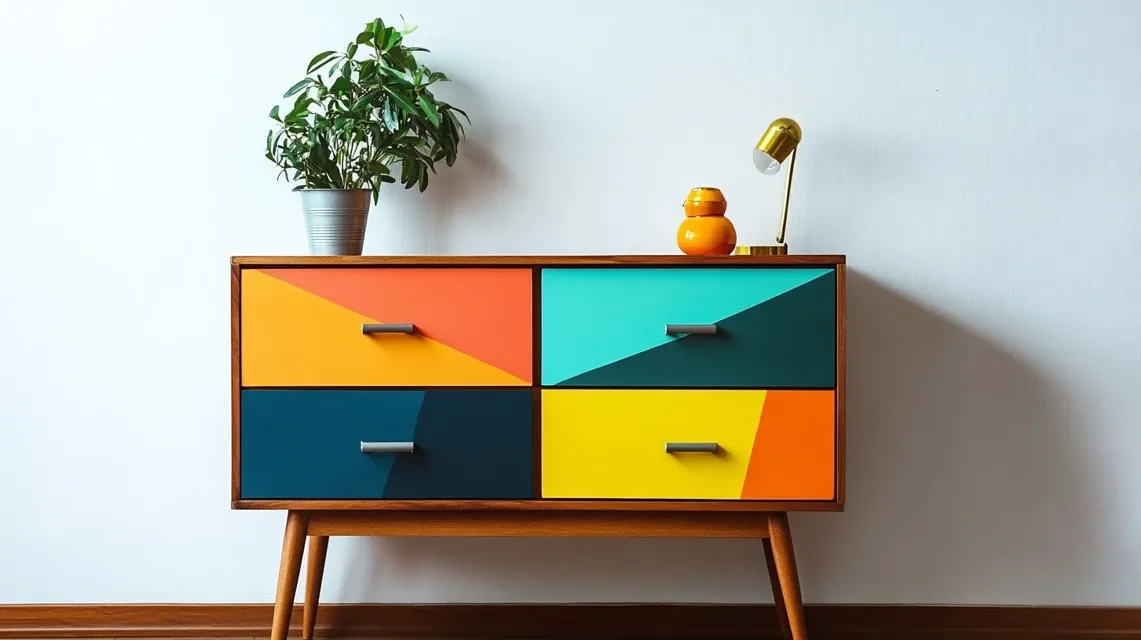
Paint each drawer a different color or divide drawers into halves with strong lines. Use painter’s tape to mark off areas and create sharp edges.
Pick colors that stand out but still match. This design makes the dresser look more playful and exciting. It’s fun, easy, and works well in kids’ rooms or art spaces.
12. Ombre Fade
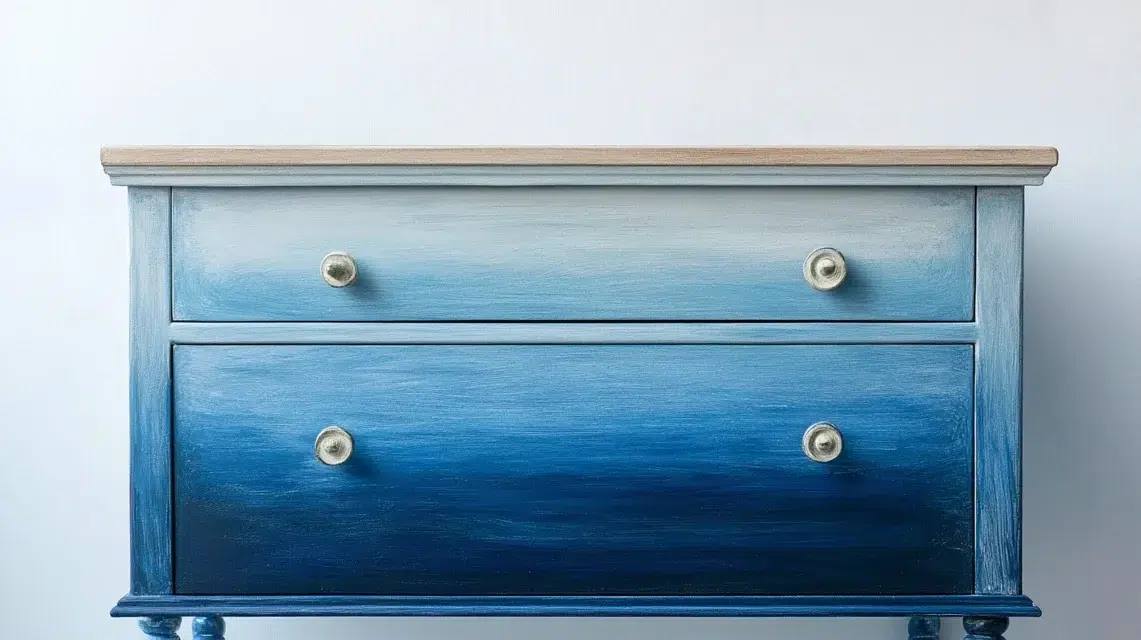
Choose one color and paint the drawers from lightest to darkest, top to bottom. Use different amounts of white mixed into your base color.
This smooth fade looks cool and clean. It’s easy to do and adds a soft touch. Works best with pastels, blues, or greens for a gentle and modern feel.
13. Sunset Shades
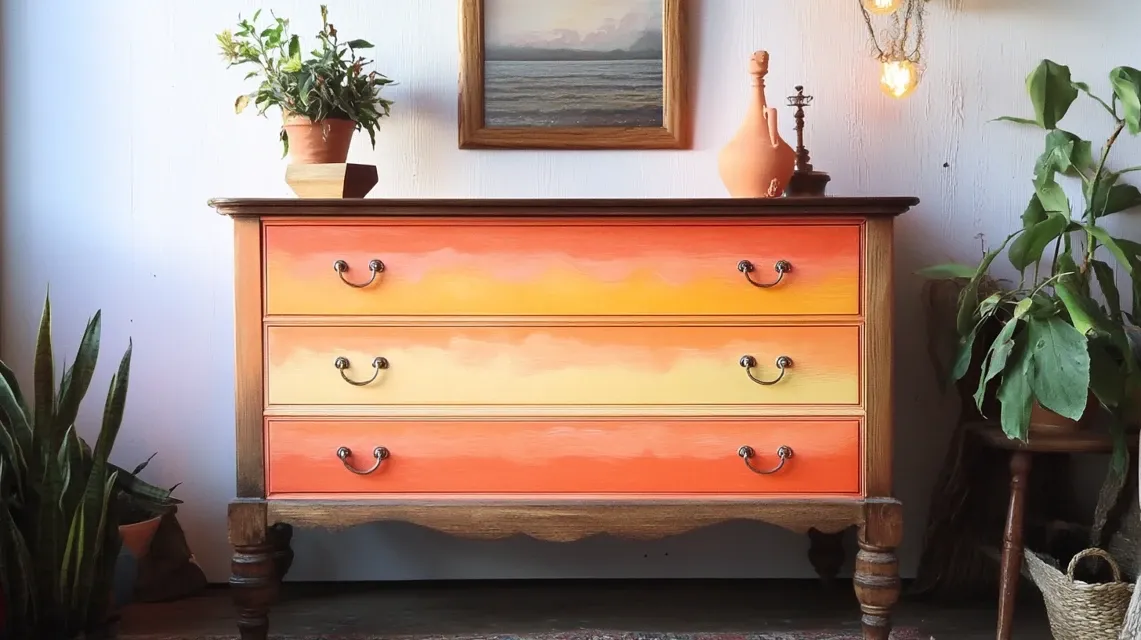
Use warm colors like orange, red, pink, and yellow to paint your dresser in layers. Try blending them together with a sponge or brush for a soft mix.
It creates a cozy, happy look that brightens up any room. Add plain wooden knobs to balance out the strong, fun colors.
14. Two-Tone Finish
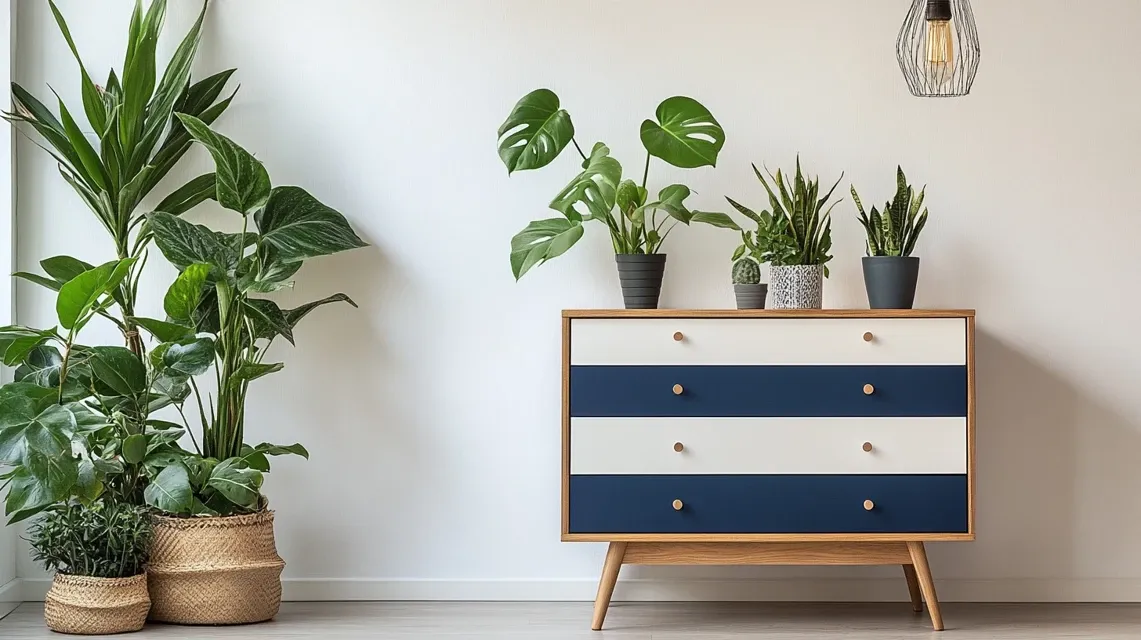
Paint the top and sides of the dresser one color, and the drawers another. Try navy and white, or green and tan. This adds contrast without being too much.
Make sure to let one part dry before starting the next. It’s simple but makes the dresser feel more custom and grown-up.
15. Rainbow Drawers

Paint each drawer a different bright color to create a full rainbow. Start with red at the top and end with purple at the bottom.
It’s great for kids’ rooms, art areas, or playful spaces. Keep the dresser frame white or black so the colors stand out. It’s cheerful and fun.
16. Painted Geometric Shapes

Use painter’s tape to create triangles, squares, or diamonds. Fill them with bold colors that go well together. This gives the dresser an artsy, fresh style.
It works on drawer fronts or the top surface. Just be sure the paint is fully dry before removing the tape for sharp edges.
17. High-Gloss Color Pop
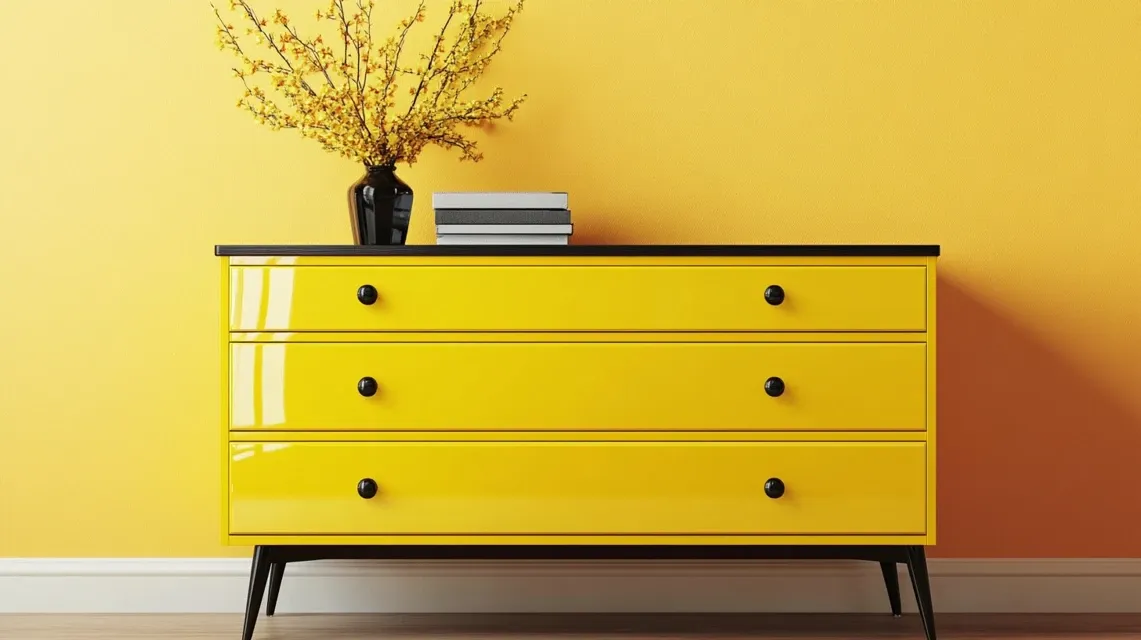
Pick one bright color like red, teal, or yellow and use a shiny gloss paint. This makes the dresser really stand out. It reflects light and makes even old furniture look bold and fresh.
Best for simple dressers with clean lines. Add black or metal knobs for a more finished look.
18. Soft Pastel Mix
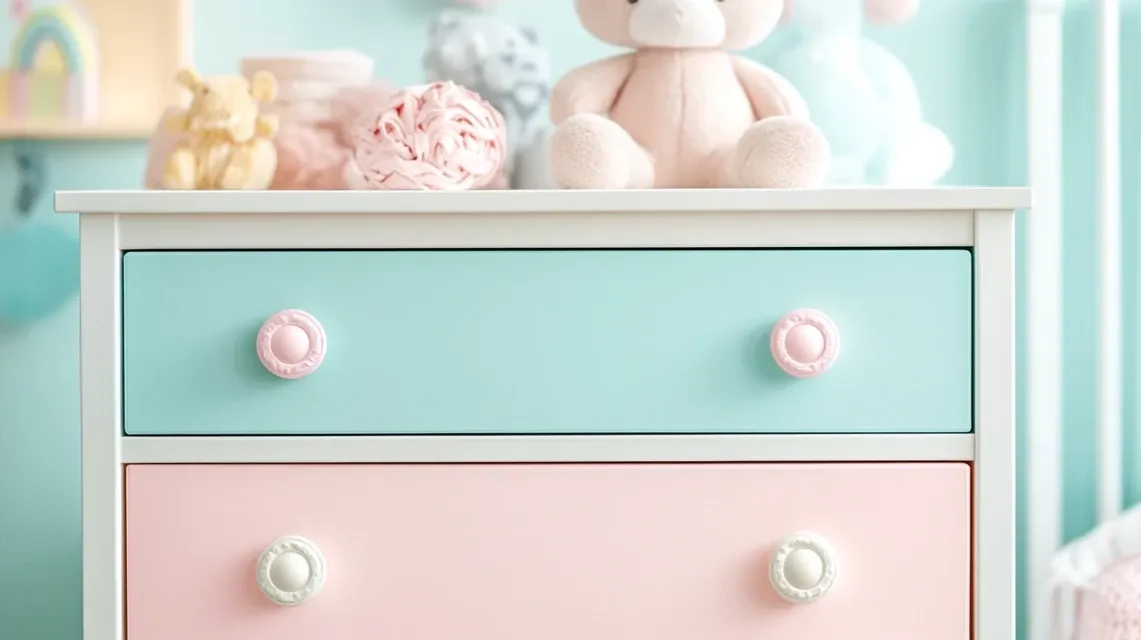
Use pale pinks, mint, sky blue, and soft yellow to paint each drawer. Keep the frame white or light gray. This gives the dresser a gentle, calm look.
Great for nurseries or bedrooms. You can also switch the drawer order to change how the colors flow from top to bottom.
19. Painted Drawer Frames Only
Instead of painting the whole drawer, just paint the edges around each drawer opening. Keep the drawers natural wood or a soft color.
This adds a little pop without going overboard. It’s a simple twist that gives a fresh look and works well if you’re short on time or paint.
20. Chalkboard Paint Drawers
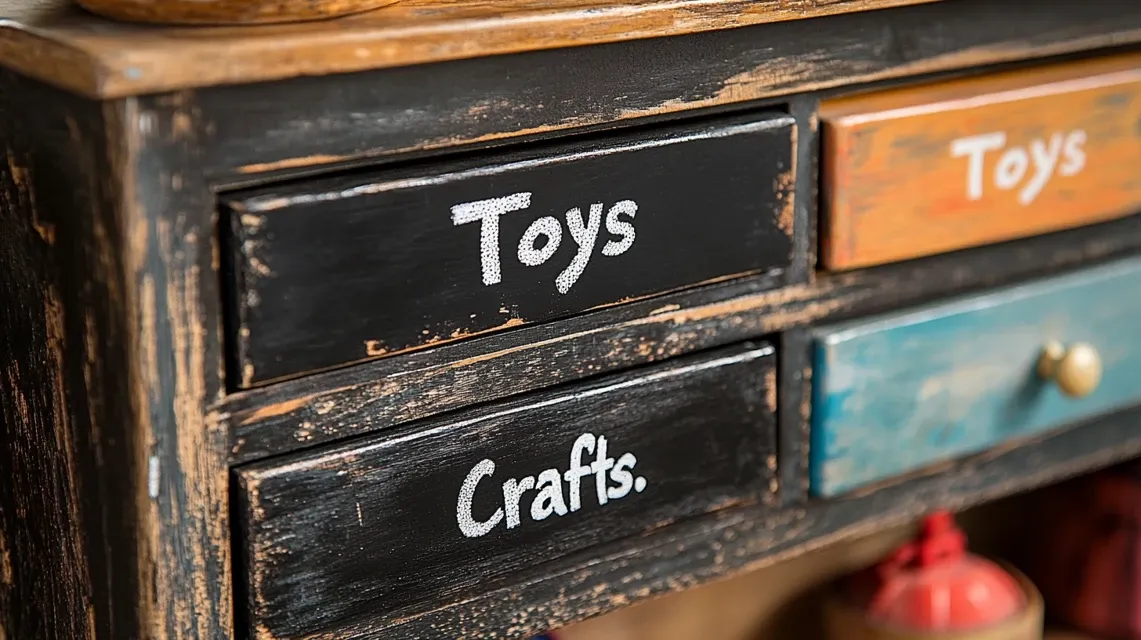
Paint drawer fronts with chalkboard paint. Then you can write labels, doodles, or change messages anytime. Works great in kids’ rooms or for organizing craft supplies.
Just remember to use primer first so the paint sticks well. Keep chalk nearby and have fun changing up the look whenever you want.
Farmhouse and Rustic Style Restorations
Give your dresser an old-time feel with soft paint, natural wood, and simple hardware. These ideas bring warmth and charm. Perfect for cozy homes, country styles, or a laid-back look.
21. Whitewashed Finish
Thin down white paint with water and brush it lightly over the wood. Wipe some off with a rag before it dries. This keeps the wood grain visible but softens the look.
It gives your dresser an old-time country feel without needing many tools. Works great with rougher wood surfaces.
22. Soft Chalk Paint Look
Chalk paint dries fast and has a soft, powdery finish. You don’t have to sand much first, and it sticks to most surfaces.
Pick simple colors like beige, gray, or faded blue. It gives your dresser a cozy, used feel that fits well in farmhouse or cottage-style rooms.
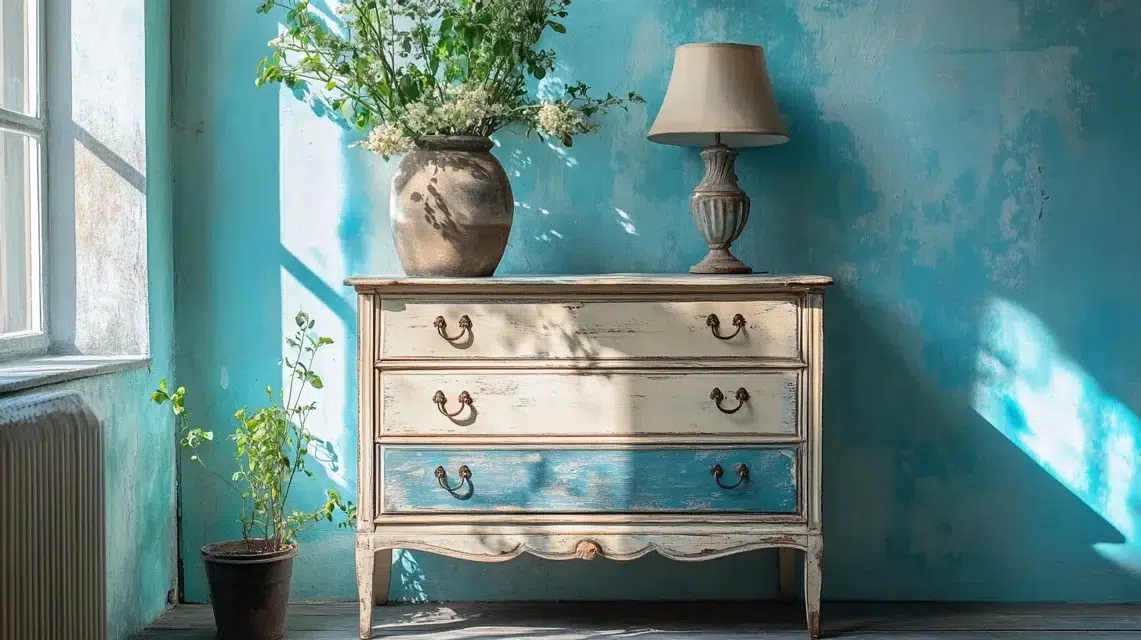
23. Distressed Edges
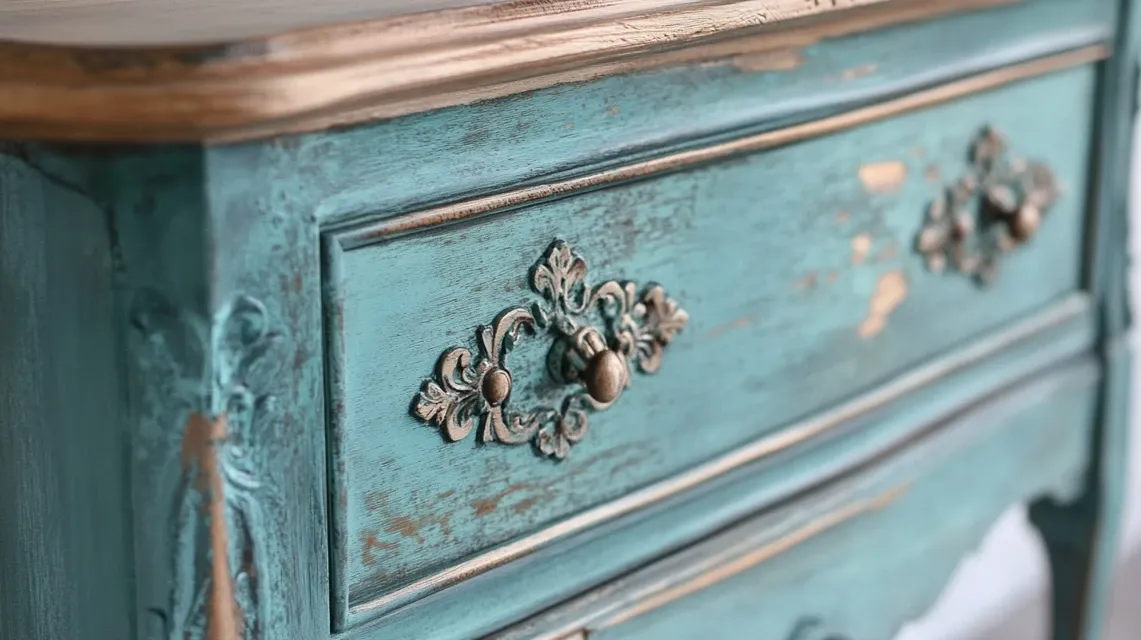
Paint your dresser, let it dry, then sand corners and edges to show the wood underneath. This makes it look older, like it’s been around for years.
It adds charm without needing extra tools. Choose soft colors like cream, light gray, or pale blue for a classic country finish.
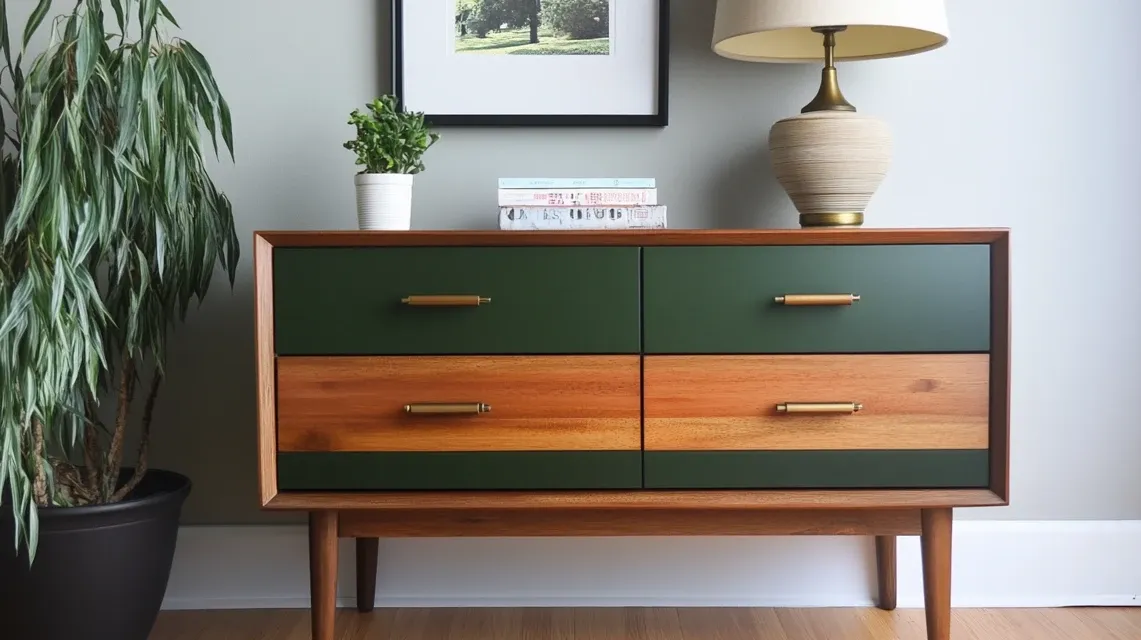
24. Wood and Paint Mix
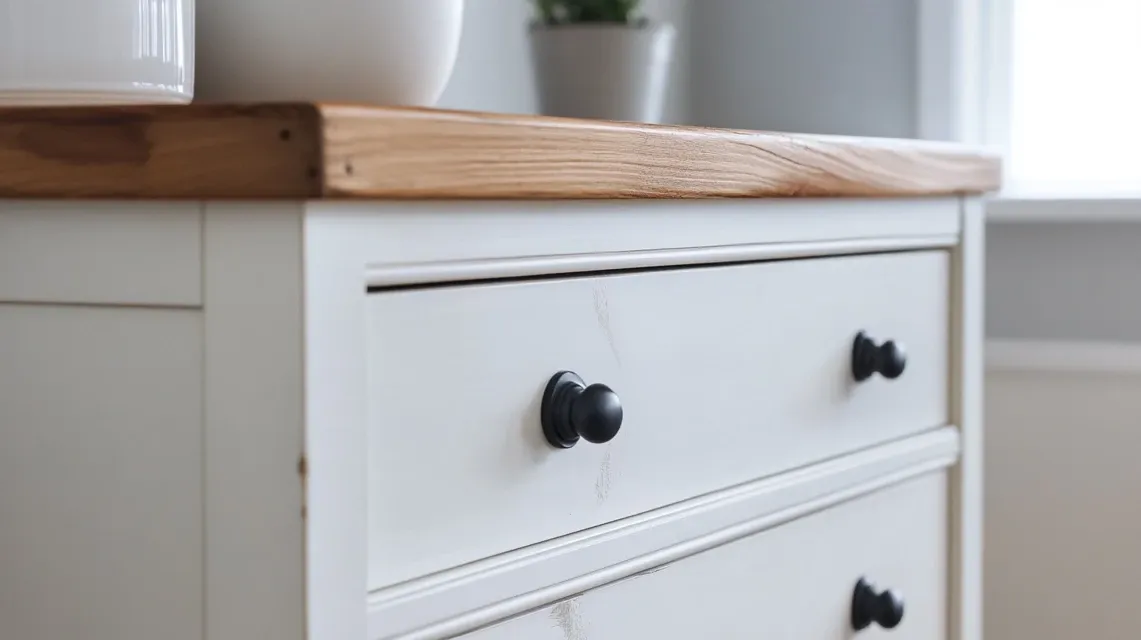
Leave the top of the dresser natural wood and paint the rest. Sand and stain the top for a deeper color. This mix keeps it feeling old-fashioned but clean.
Try white paint with a dark stained top for a popular farmhouse look. Add black or wood knobs to match.
25. Antique-Style Stain Finish

Use dark wood stain and rub it in with a cloth. Let it soak in and wipe off the extra. The deeper color highlights grain and gives it a warm, used look.
Stain is perfect if you want the dresser to look older without adding paint. Best used on solid wood only.
26. Worn Paint Layers
Paint the dresser in one color, let it dry, then paint over it with another. Once dry, sand through parts of the top layer to show the bottom color.
It looks like layers have built up over time. Great with cream over blue or white over gray for a vintage touch.
27. Rustic Barnwood Trim

Add thin pieces of old wood along drawer edges or the top. Nail or glue them in place. This makes the dresser feel rough and handmade.
If you can’t find real barnwood, stain new wood in gray or dark brown. Mix it with simple knobs for a natural look.
28. Old-World Hardware Add-On
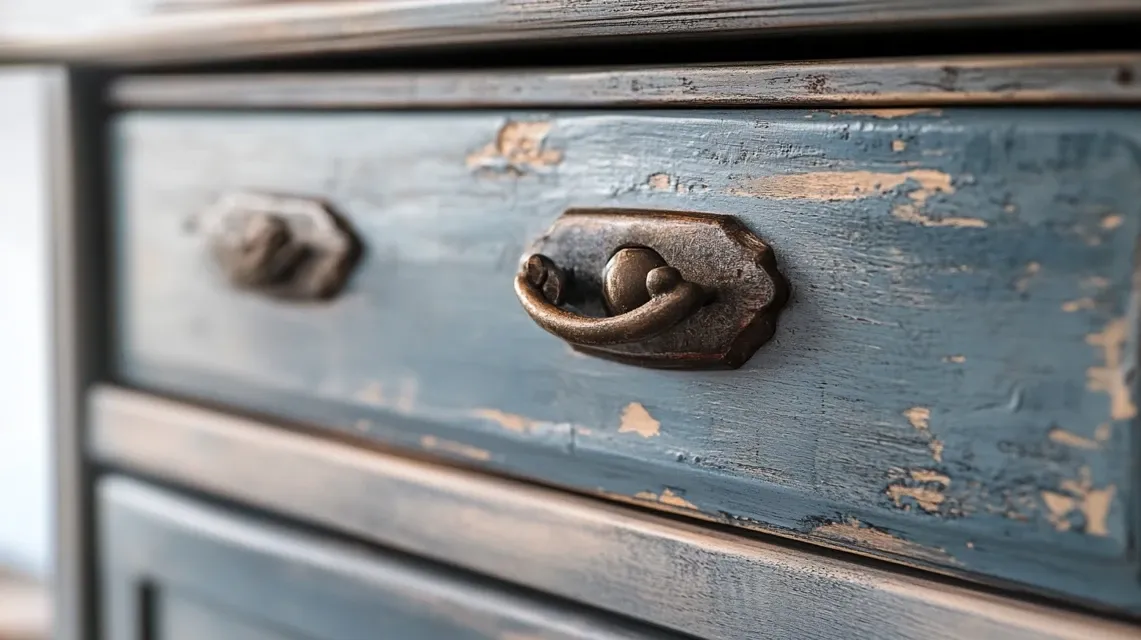
Switch out the handles with worn-looking metal pulls or black cup-style hardware. These give your dresser a strong farmhouse look right away.
Look for ones that look old, rusty, or matte. Even without changing paint or wood, this one change makes a big difference in style.
29. Crackled Paint Effect
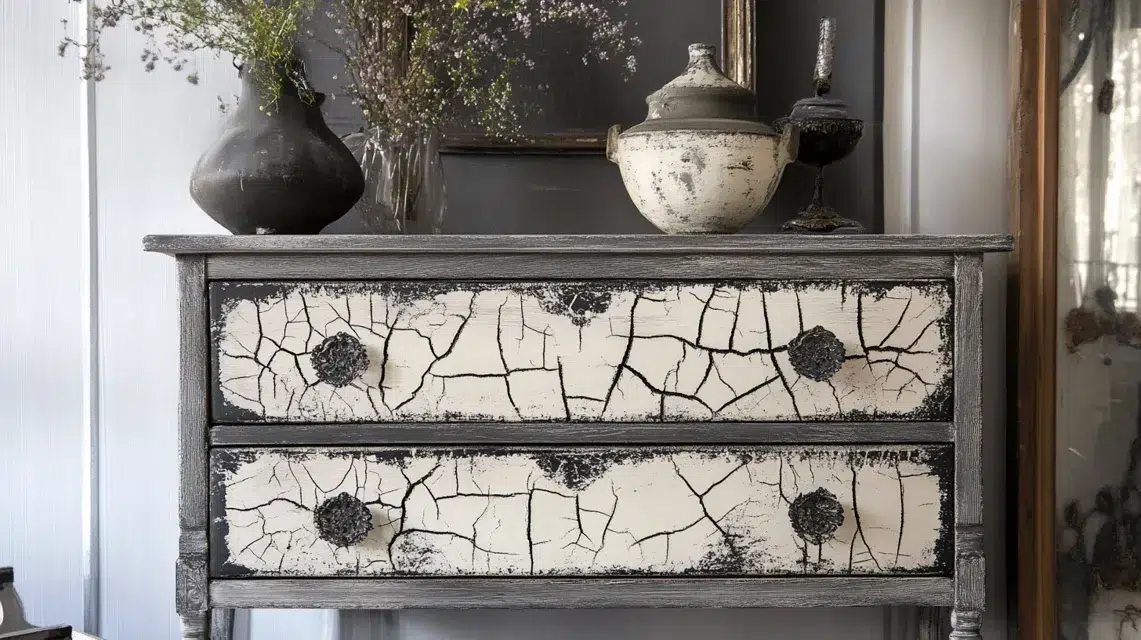
Use crackle glaze between two layers of paint. The top layer will crack as it dries, showing the color underneath. This makes it look like the dresser has aged naturally.
It’s a fun method that gives real farmhouse charm. Works best with soft, faded colors and smaller dressers.
30. Beadboard Drawer Fronts

Cut thin beadboard panels to fit your drawer fronts and glue them on. Paint over them in white or gray. This adds texture and makes the dresser look like it came from a farmhouse kitchen.
It’s a bit more work, but it gives a strong country feel that’s hard to beat.
Sleek Mid-Century and Modern Looks
These styles use straight lines, simple colors, and smooth finishes. Clean designs with small details like angled legs or flat pulls help your dresser fit well in today’s modern or retro space.
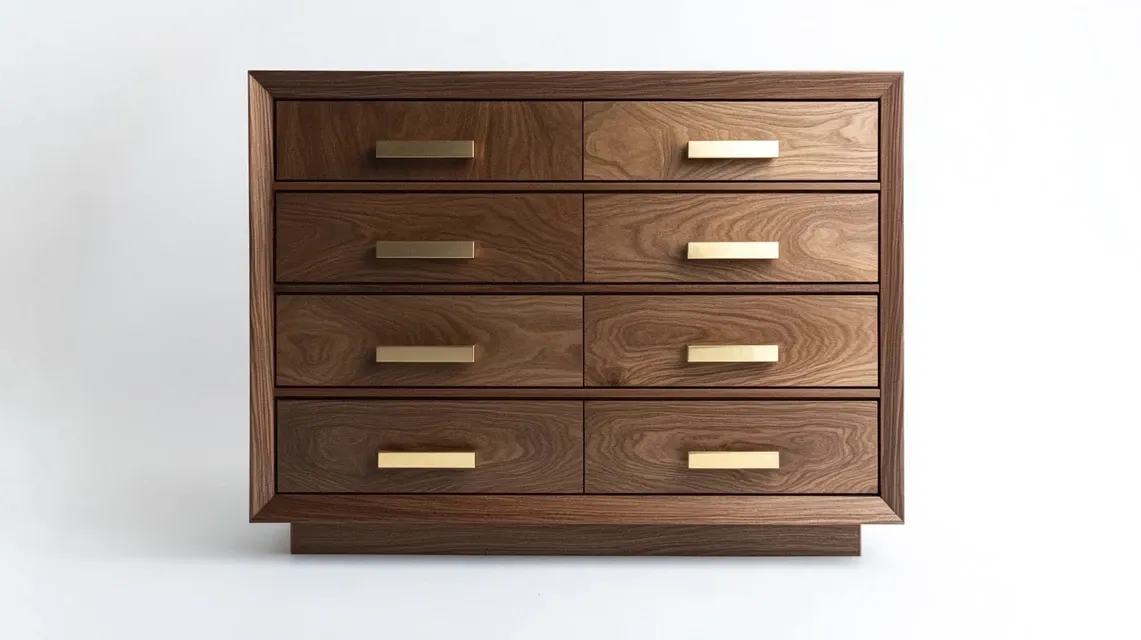
31. Matte Black Finish
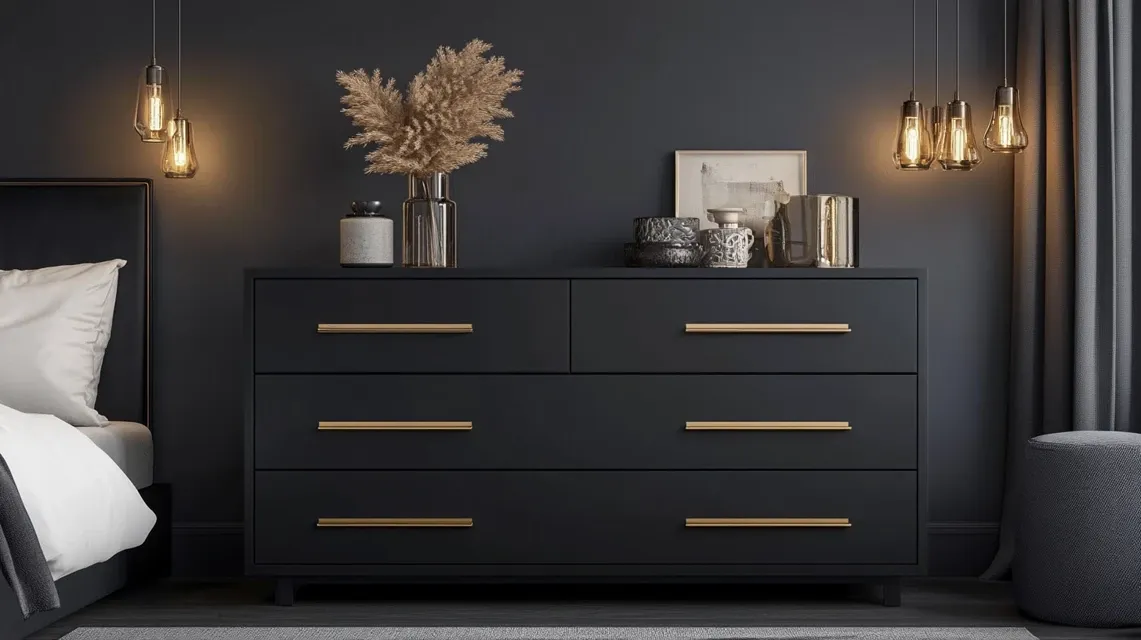
Paint the entire dresser in flat black for a bold and clean look. This style works best on dressers with straight lines and flat drawer fronts.
Add brass or wooden handles for contrast. The result is simple, sharp, and fits well in modern spaces. Use two coats for full coverage.
32. Walnut-Stained Wood
Sand down the dresser and apply walnut-colored wood stain. This gives a rich brown tone that’s common in mid-century furniture.
Use thin coats and wipe off extra with a cloth. Pair the stain with gold or black hardware. Keep the legs and frame bare wood if possible to match the look.
33. Tapered Legs Add-On
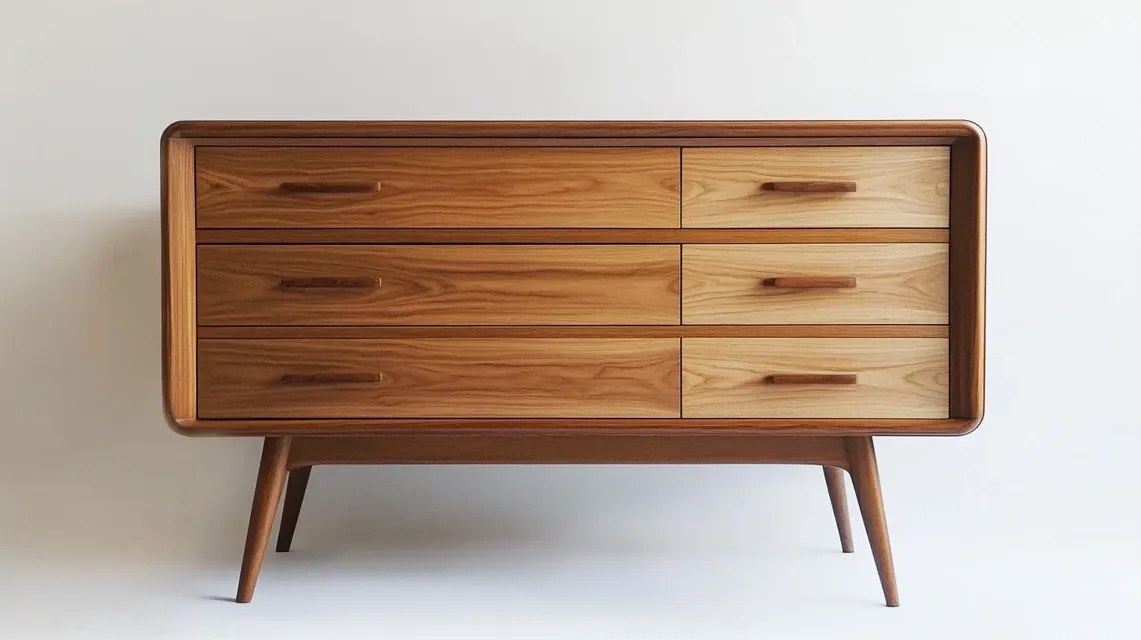
Swap chunky legs with simple tapered ones. These slant slightly and make the dresser feel lighter. Use legs with a natural wood finish or black paint.
They attach easily using brackets. Even without painting the whole dresser, changing the legs gives it a strong mid-century style that works well in small rooms.
34. Two-Drawer Color Split
Paint the top two drawers one color, and leave the bottom two natural or painted in a softer shade. This style is clean and not too busy.
Try colors like deep green with a wood base, or gray over white. Match the hardware to both colors to tie it together.
35. Flat Drawer Pulls

Use low-profile metal pulls or cut-out drawer holes instead of knobs. This keeps the surface clean and smooth. Pick pulls in silver, black, or natural wood.
If you’re painting, go with solid tones like gray, navy, or white. The flat look makes the dresser feel more grown-up and sleek.
Creative Repurposing Projects
Change your dresser into something totally new. These projects help you make benches, bookshelves, vanities, or kitchen pieces.
Great for saving space and getting more use out of old furniture.
36. Dresser Turned Bench
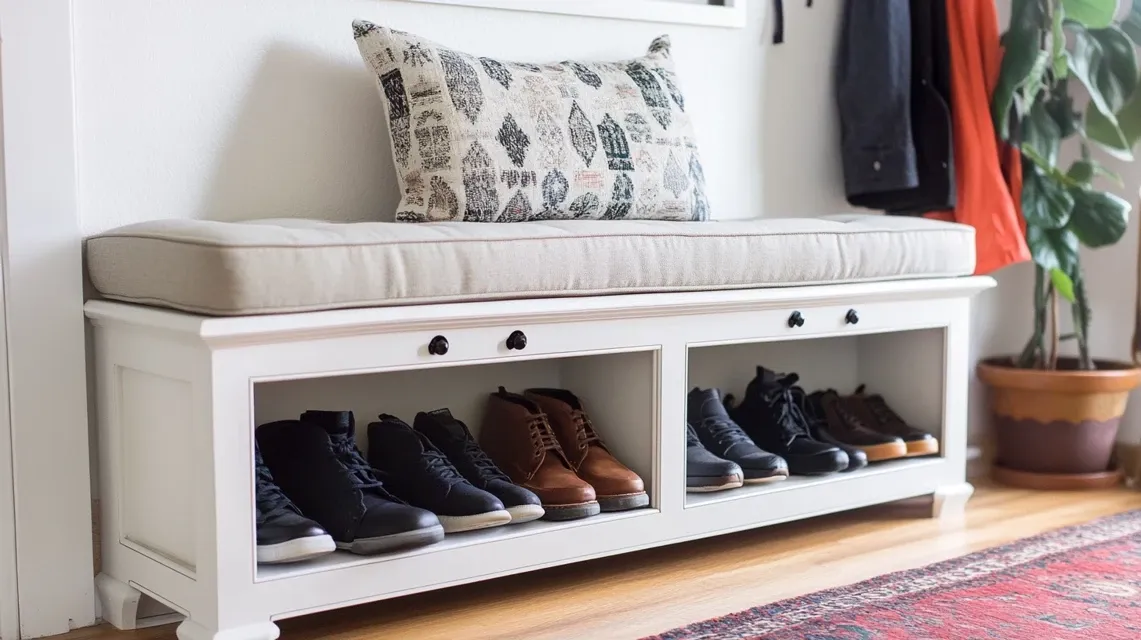
Remove the top drawers, add a wooden seat over the opening, and paint or stain the whole dresser. Add a cushion or pillows on top for comfort.
Now it’s a bench with storage underneath. This works well in entryways or at the foot of a bed. It’s a smart way to reuse an old dresser.
37. Make a Vanity
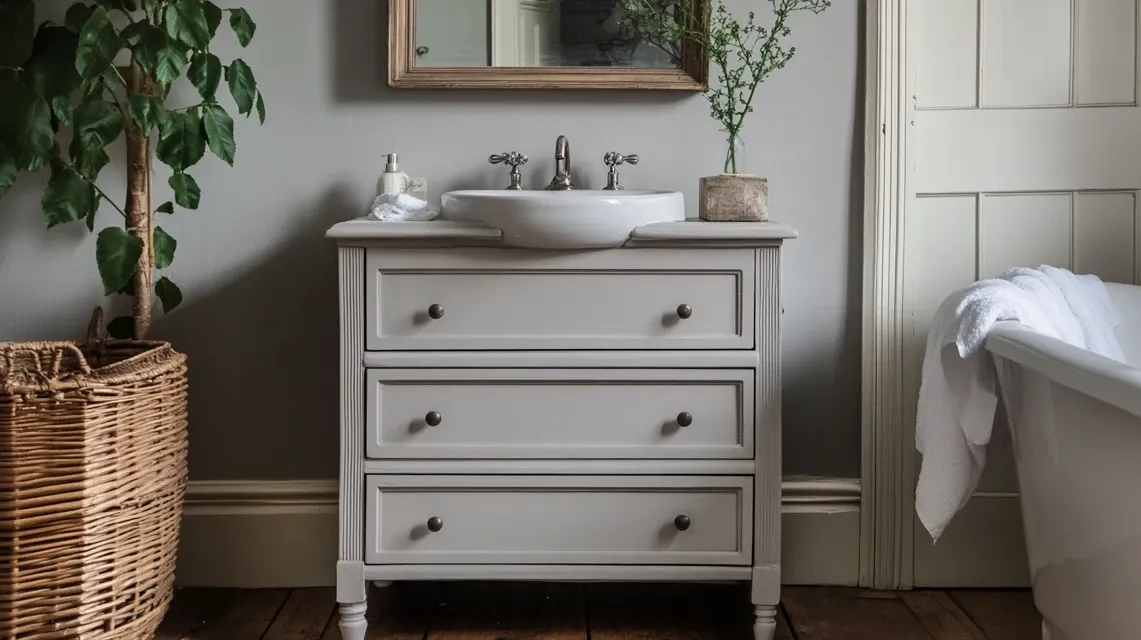
Take out the top drawers and cut space for a sink. Paint or stain the dresser and seal the surface. Now it’s a bathroom vanity with drawers for storage.
Be sure to check the plumbing space before starting. It gives your bathroom a different look while keeping things useful and organized.
38. Kitchen Island Conversion
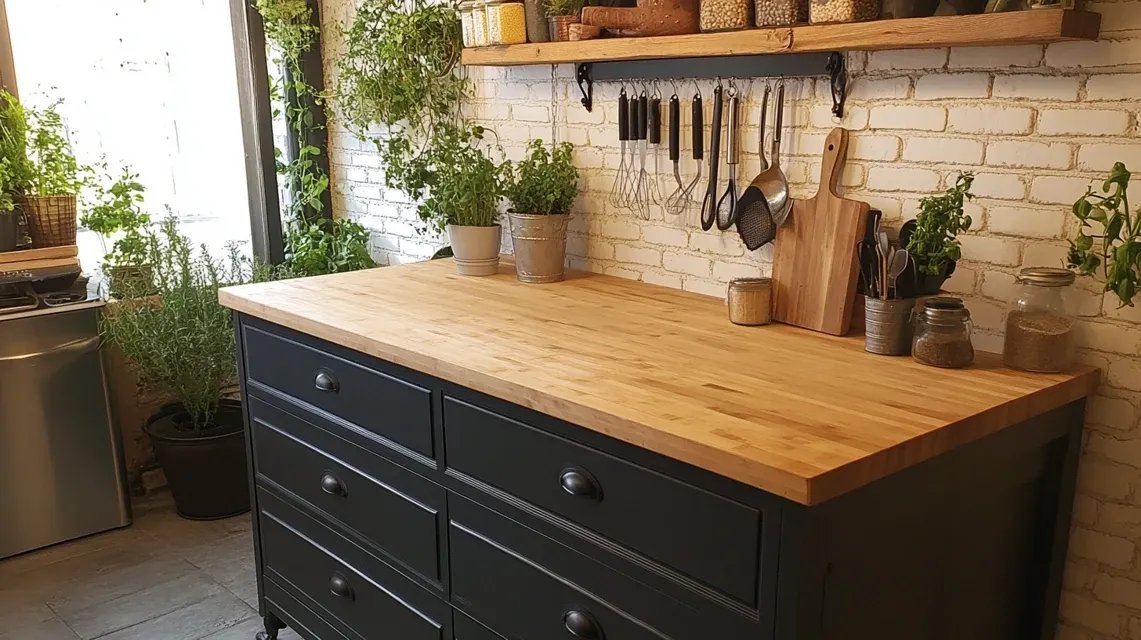
Use a wide dresser as a base for a kitchen island. Paint it, add wheels or legs, and place a butcher block or stone top. Remove some drawers for open shelves if needed.
It gives extra counter space and storage. Works best in open kitchens or for people who love cooking.
39. Turn Into a Bookshelf
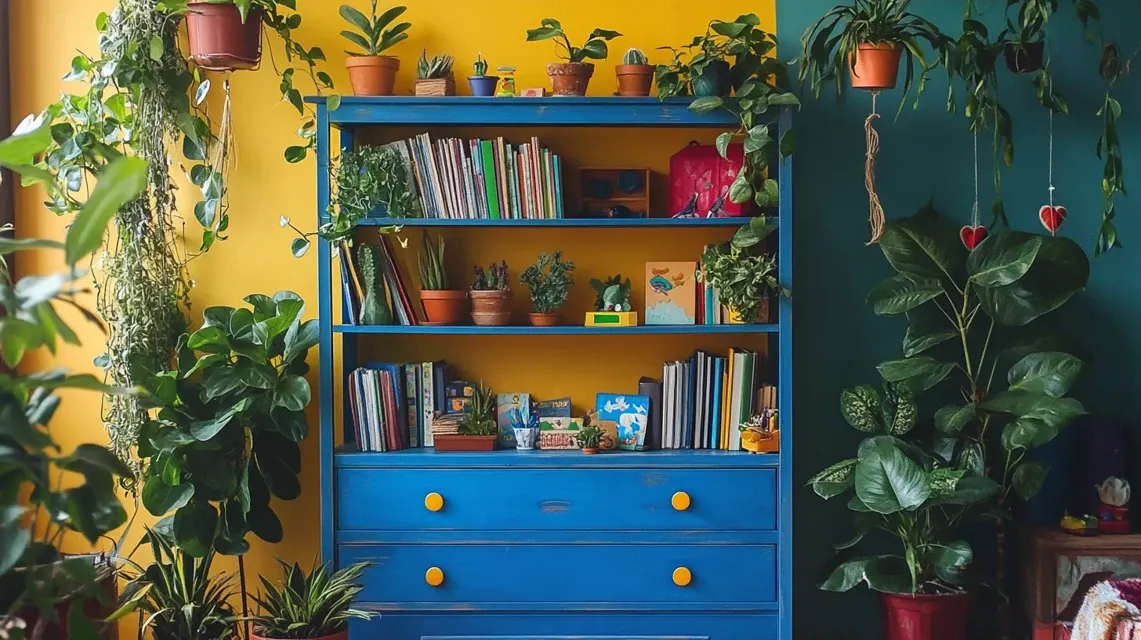
Remove all drawers and add wooden boards across the empty spaces. Paint or stain as needed. Now you’ve got shelves for books, plants, or bins.
It’s perfect for kids’ rooms, classrooms, or reading corners. You can even keep the bottom drawer or two for hidden storage. Simple, sturdy, and helpful.
40. TV Stand Upgrade
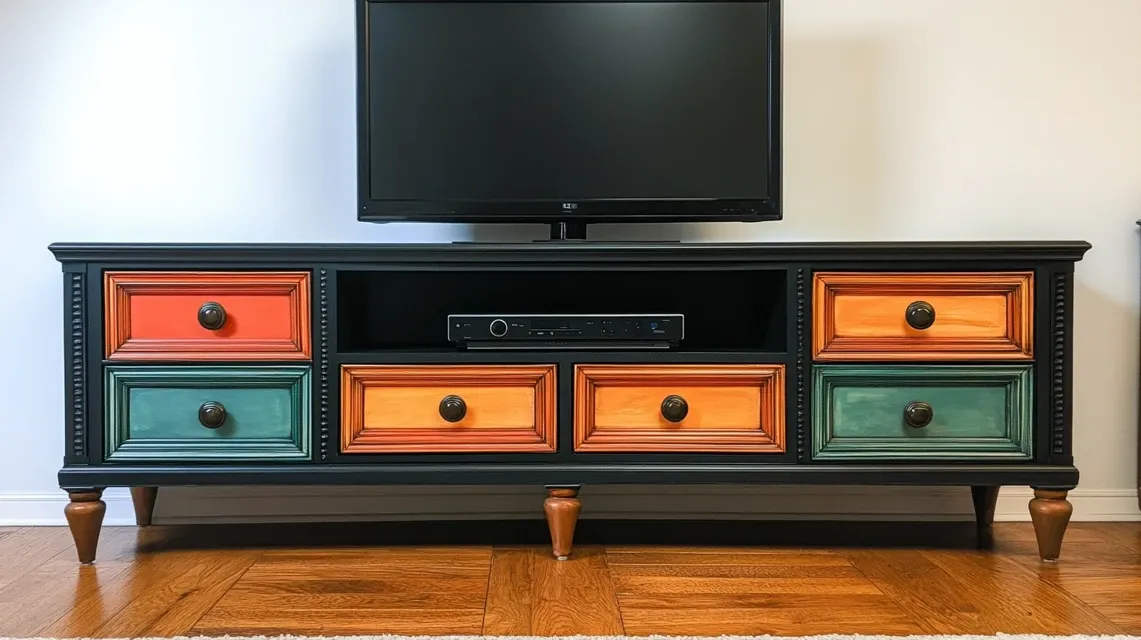
Cut out a space in the middle for media boxes or game systems. Keep side drawers for storage. Paint or stain to match your living room.
You can drill holes in the back for cables. It’s a great way to reuse an old dresser and make it useful again in a new space.
What Not to Do When Restoring a Dresser
Here’s a quick list of common mistakes to avoid so your dresser makeover turns out smooth, safe, and long-lasting.
- Don’t skip cleaning, as dirt makes paint peel.
- Don’t paint over loose or chipped surfaces.
- Don’t forget to test paint or stain on a small spot first.
- Don’t use wall paint because furniture needs stronger finishes.
- Don’t sand laminate too hard, it can tear.
- Don’t rush drying time between coats.
- Don’t use cheap brushes as they leave streaks.
- Don’t mix oil-based and water-based products.
- Don’t ignore wobbly legs or drawers; always fix them first.
- Don’t forget safety, always wear gloves, a mask, and work in fresh air.
Wrapping Up
This collection gave you practical, creative ways to breathe new life into any old dresser. From color choices and hardware swaps to modern and rustic styles, it covered all the key ideas you might need.
You now have plenty of starting points, no matter your taste or experience level.
If you’ve been holding onto a worn piece of furniture, this might be the right moment to do something with it. Grab your tools, pick a favorite style, and go for it.
And if you’re looking for more help or need fresh ideas for other DIY projects, feel free to check out the rest of the blogs. There’s always something new to try.